- Geek in Heels - https://www.geekinheels.com -

Bloggy Thursdays: Customizing the Twitter Widget Pro Plugin

Welcome to this installment of Bloggy Thursdays, where I share with my fellow bloggers tips and tutorials to maximize and better your blog. While I do not consider myself an expert, I do like to think that after 10+ years of blogging — in addition to my technical knowledge — I know more than the average blogger when it comes to making your blog more appealing to readers.

Do you have any comments, questions, or topics you’d like to see covered here? Please send me a message via my contact form. Enjoy!


A couple of weeks ago, Rachael, Really commented on my WordPress plugins post and asked me to detail how I got my Twitter widget to look the way it does. As I am always looking for new ideas and topics to cover in Bloggy Thursdays — as well as Cool Tool Tuesdays and Reverent Sundays — I couldn’t help but oblige. 🙂

(Before I go on any further, I should mention that this is another WordPress-specific tutorial. Sorry to all my non-WordPress blogger readers!)

First, download the Twitter Widget Pro plugin. What I like about this plugin is that it is a Twitter widget that is meant to be customized — this is apparent by its default, bare-bones look. However, with some creativity, you can get it to look practically any way you want.

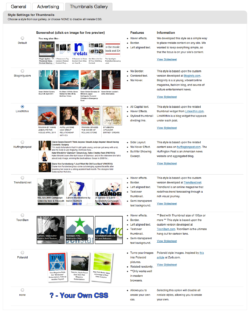
Another great thing about Twitter Widget Pro is that it gives you tons of options as a widget even before you get into the CSS. This is how I set up the widget in the “Widgets” section of my WordPress admin:

Now, let’s get to the nitty gritty part!

When you download the Twitter Widget Pro plugin, you will notice that the plugin package comes with several files. You want to locate the file called wp-twitter-widget.php and open it in your favorite text/code editor.

Now this is the important part. You want to REPLACE lines 561-680 with the following: (Note: these lines are consistent with the most current version of Twitter Widget Pro, which is version 2.3.8. If you are working with another version, the line numbers may be different.)

if ( empty( $args['title'] ) )
			$args['title'] = "Twitter: {$args['username']}";

		$args['title'] = apply_filters( 'twitter-widget-title', $args['title'], $args );
		$args['title'] = "{$args['title']}";
		$widgetContent .= $args['before_title'] . $args['title'] . $args['after_title'];
		$widgetContent .= '
    '; if ( count( $tweets ) == 0 ) { $widgetContent .= '
  • ' . __( 'No Tweets Available', $this->_slug ) . '
  • '; } else { $count = 0; foreach ( $tweets as $tweet ) { // Set our "ago" string which converts the date to "# ___(s) ago" $tweet->ago = $this->_timeSince( strtotime( $tweet->created_at ), $args['showts'], $args['dateFormat'] ); $entryContent = apply_filters( 'widget_twitter_content', $tweet->text ); $widgetContent .= '
  • '; $widgetContent .= "
    {$entryContent}
  • '; if ( ++$count >= $args['items'] ) break; } } $widgetContent .= '
'; if ( 'true' == $args['showfollow'] ) { $widgetContent .= ' '; } if ( 'true' == $args['showXavisysLink'] ) { $widgetContent .= ' '; } $widgetContent .= '
' . $args['after_widget']; if ( 'true' == $args['showintents'] || 'true' == $args['showfollow'] ) { wp_enqueue_script( 'twitter-widgets', 'http://platform.twitter.com/widgets.js', array(), '1.0.0', true ); if ( ! function_exists( '_wp_footer_scripts' ) ) { // This means we can't just enqueue our script (fixes in WP 3.3) add_action( 'wp_footer', array( $this, 'add_twitter_js' ) ); } } return $widgetContent; }

Even if you don’t know any PHP, you should be able to recognize some HTML lying within the code above. Pay particular attention to what comes after each instance of $widgetContent .= because that’s where the HTML is located.

The only things you may want to change are the symbols I used for Tweet Intents (reply, retweet, favorite). If you wish to do so, you can change them on lines 63, 69, and 75 above. Just replace what’s between the ‘ ‘ marks to get your desired effect.

Next, you want to add the following CSS. You can do this by pasting it to your style.css file, or create a new CSS file with the code and point to it in your theme.

.tweets {
	overflow: hidden;
	display: block;
	margin: 10px -2px 0 -2px;
	padding: 6px 6px 6px 10px;
	background-color: #DDEEF6;
	-moz-border-radius: 6px;
	-khtml-border-radius: 6px;
	-webkit-border-radius: 6px;
	border-radius: 6px;
	list-style: none;
	font-family: Verdana, sans-serif;
	font-size: 11px;
	color: #565656;
}

.twitter-bottom {
	margin: 0;
	padding-top: 16px;
	background: url('/images/twitter-stem.png') no-repeat 22px 0;
}

.twitter-avatar {
	float: left;
	margin-right: 5px;
	padding: 1px;
	height: 34px;
}

.twitter-avatar img {
	margin-top: 2px;
	border: 4px solid #DDEEF6;
	width: 30px;
	height: 30px;
}

.twitter-meta {
	margin-top: 6px;
	font-size: 11px;
}

.intent-meta {
	float: right;
}

.intent-meta a:link, .intent-meta a:visited, .intent-meta a:active {
	color: #999999;
}

.intent-meta a:hover {
	text-decoration: none;
	color: #666666;
}

What you will probably want to change here are the colors. The background color of the widget (the light blue) can be found on line 6, and you will notice that I used the same color for the border around my avatar (line 32). The text color is on line 14, while the links colors are on lines 47 (regular link color) and 52 (mouseover link color).

The only thing that I ask is that should you choose to use a bubble stem like I did on mine, you host it on your own server. My stem image can be found at this URL, which you can download to use for yourself. And, of course, should you do so, you should change the URL on line 20. (If you decide not to use a stem, you can just delete that line.)

And that’s it! I know that seeing all this code can be intimating, but I promise that if you follow the instructions carefully, it isn’t that bad at all.

As always, please leave any questions you may have by commenting to this post, and I will try my best to answer them!


ETA: Commenter Mochi and Macarons asked that I provide the exact code to be replaced rather than the line numbers. I have decided that it would be easier to provide the edited version of the wp-twitter-widget.php file which can be downloaded here in ZIP format.

You may also like: