I have stated numerous times that I don’t really believe in SEO (search engine optimization) tactics. Sure, you can painstakingly devote many hours (or even pay someone) to optimizing your site for search engines, but in the end, what helps the most is good content.
That being said, roughly half of my traffic comes from search engines, and after 10+ years of blogging, I like to think that I have picked up some tips to help you get your site easily and efficiently found by web searches. Some of these tips are no-brainers for any seasoned blogger, while others are extra little things I have discovered over the years to significantly increase traffic from search engines. Enjoy!
1. Install an SEO plugin.
If you are running WordPress, this is pretty simple to do. The All in One SEO Pack is perhaps the most popular of them all, and for good reason. Even if you don’t know a thing about SEO, just set it to its default settings and you’re good to go.

2. Build an XML sitemap.
A sitemap is a list of pages of a website that are accesible to visitors. And since Google, Yahoo, Bing, and Ask all use the same protocol for accepting sitemaps (which is in XML format), having an XML sitemap for your website will make it that much easier for these search engines to crawl your site.
Once again, if you are using WordPress, you can easily do this by installing the Google XML Sitemaps plugin, which automatically builds — and updates — the sitemap for you. Or, if you’re not on WordPress, you can visit one of the many XML sitemaps generators online (like XML-Sitemaps.com) and have them generate one for you, then upload it to your site.
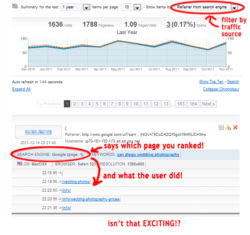
3. Sign up for a Google Webmaster Tools account.
Google is the world’s largest and foremost search engine. Google likes its own products and services, and plays well with them. So go sign up for a Google Webmaster Tools account now, so that you can:
- “Claim” your website
- Set up how Google will crawl your site
- Access data such as error/crawl logs, web metrics, and analytics.

4. Optimize your site for faster loading.
In 2010, Google announced that it will start counting speed as a ranking factor. And while it claims that only a very small number of websites will be significantly affected by this change, it never hurts to ensure that your site loads fast and efficiently, right?
Here are some free services that will allow you to evaluate, and analyze the speed of your site:
- Google Page Speed — Google’s own tool for evaluating the performance of web pages. It also provides suggestions for improvement.
- YSlow — a free tool from Yahoo! that suggests ways to improve website speed.
- WebPagetest — shows a waterfall view of your pages’ load performance plus an optimization checklist.
- Google Webmaster Tools — under Labs -> Site Performance, you can view the speed of your website as experienced by users around the world.
If you feel that your site could use a speed boost, the easiest thing to do (as a WordPress user) is to download one of the many caching plugins available, like WP Super Cache, W3 Total Cache, or Quick Cache. I have tried all three and found Quick Cache to be simplest and least intrusive, but this really depends on your own site and preferences.
You can also try CloudFlare, which claims to “supercharge” your site.
I personally use Google Page Speed Service (PSS) for this site. While results vary between different caching/optimization services for each website, I personally have found PSS to deliver the best results. You can see more of my own thoughts on PSS here. Plus, see what I said above about Google liking its own products. 😉
5. Make sure you are pinging as many services as possible.
I’m always amazed whenever I look at friends’ or clients’ blog installations and see that they’re only set to ping one or two services. (If you have no idea what I’m talking about, pinging is done when you update your site and your platform notifies site updating services of the change.) Here is a list of ping services that I use on all my websites:
http://blogsearch.google.com/
http://api.my.yahoo.com/RPC2
http://rpc.pingomatic.com
http://rpc.twingly.com
http://api.feedster.com/ping
http://api.moreover.com/RPC2
http://api.moreover.com/ping
http://api.my.yahoo.com/RPC2
http://api.my.yahoo.com/rss/ping
http://www.blogdigger.com/RPC2
http://www.blogshares.com/rpc.php
http://www.blogsnow.com/ping
http://www.blogstreet.com/xrbin/xmlrpc.cgi
http://bulkfeeds.net/rpc
http://www.newsisfree.com/xmlrpctest.php
http://ping.blo.gs/
http://ping.feedburner.com
http://ping.syndic8.com/xmlrpc.php
http://ping.weblogalot.com/rpc.php
http://rpc.blogrolling.com/pinger/
http://rpc.technorati.com/rpc/ping
http://rpc.weblogs.com/RPC2
http://www.feedsubmitter.com
http://blo.gs/ping.php
http://www.pingerati.net
http://www.pingmyblog.com
http://geourl.org/ping
http://ipings.com
http://www.weblogalot.com/ping
On WordPress, you would copy & paste this list into Settings -> Writing -> Update Services.
6. Write VERY descriptive titles.
This may sound self-explanatory, but so many bloggers easily ignore this rule (including myself). Always remember that search engines place higher priority on titles than the body of the post. Which do you think will have better SEO results:
“How to Fly a Kite”
or,
“How to Fly a Kite in High Altitude and Low Wind Conditions”
Not only will descriptive titles ensure that visitors find exactly what they’re looking for when they click on through from a search engine, it will also place you higher in rankings because the chances of others using that same (or a similar) title are lower.
7. Don’t ignore your pictures!
Most experienced bloggers know that when uploading pictures to your site, you shouldn’t ignore the ALT tag (or the “alternate text” field). But SEO experts will also advise you to caption your photos and fill in the description fields too.
Wanna hear an additional hint? Name your pictures properly before uploading them. I have actually been doing this for quite some time now, and personally have found this to produce better results than the ALT tags, captions, or descriptions.
What do I mean by naming images? Instead of leaving your photos just as they are (e.g., “IMG_0955.jpg”), rename it to something descriptive of the photo, like “baby_playing_with_sophie_giraffe.jpg”.

“Baby Playing with Sophie the Giraffe”
8. Ask your friends to link to you!
The more sites you have linking to your own site, the higher that Google and other search engines will place you. And if the site linking back to you has high traffic and/or has a lot of sites linking to it? Much better, since this will help increase your Google PageRank.
Aside from Google Analytics and Webmaster Tools, another service that checks the number of sites linking back to you is Alexa.com. I know that some people think Alexa is on its way out, but it still is considered one of the foremost sources to check a site’s popularity. (Alexa, along with PageRank, are the services used most often by marketers to initially check stats on a site when they’re considering you for partnerships, sponsorships, and affiliations.)
I hope this was helpful to at least one reader. 🙂 If you have any questions, please don’t hesitate to ask! And if you have any further tips, please share them in the comments section!