
Prelude
Part 1: Setting Up
Part 2: Set the Bare Bones
Part 3: The Header
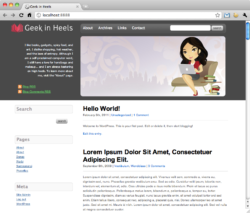
It’s been over a month since the last post in this series, and for that I apologize. This is what we had when we left off:

First, let’s work on the main menu.
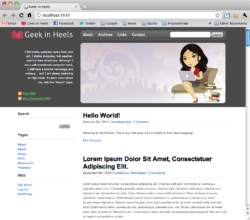
As you can see from my header image, I have incorporated the outline of the menu into the header image itself. You can choose to create a separate menu background image and lay it on top of the header image, but I find that option to add an extra step (at least with this design) so why bother?
Since the outline of the menu is already taken care of, all you need to do is to format the text, background, colors, etc of the menu items using CSS.
Once again, use Chrome’s “Inspect Element” feature (or if you’re using Firefox, use Firebug) to find out what the CSS elements are for each item you’d like to change. ET-Starter’s CSS for its menu is a bit convoluted, but once you examine it you will see that it is a series of nested lists. So while the menu in its entirety uses the #menu element, each menu item is #menu ul li a and each submenu item is #menu ul li ul a.
If you are not sure which element goes with what, just experiment, changing up different elements until you get your desired effect. And for your convenience, here is my theme’s menu CSS:
#menu {
 margin-left: 270px;
 padding-top: 21px;
 font-family: 'Trebuchet MS', Trebuchet, Verdana, sans-serif;
 font-size: 15px;
 color: #FFFFFF;
 }
#menu ul {
 position: relative;
 z-index: 300;
 margin: 0;
 padding: 0;
 }
#menu ul li a {
 margin: 0;
 padding-right: 14px;
 display: block;
 border-bottom: none;
 color: #FFFFFF;
 }
#menu ul li a:hover {
 color: #C0E0FF;
 text-decoration: none;
 }
#menu ul li {
 float: left;
 position: relative;
 margin: 0 10px 0 0;
 padding: 0 0 9px 0;
 list-style-type: none;
 }
#menu ul ul {
 position: absolute;
 display: none;
 width: 8em;
 margin: 9px 0 0 0;
 padding: 10px;
 background: #505050;
 border: 1px solid #666666;
 z-index: 99999;
 }
#menu ul li ul {
 display: none;
 width: 10em;
 padding: 0;
 position: absolute;
 z-index: 999;
 line-height: 20px;
 }
#menu ul li ul li { padding:0; }
#menu ul li ul a {
 float: left;
 width: 8em;
 height: auto;
 padding: 4px 10px;
 color: #FFFFFF;
 font-size: 12px;
 }
#menu ul li ul a:hover {
 height: auto;
 border: none;
 border-radius: none !important;
 text-decoration: none;
 color: #B3A6BB;
 }
#menu ul ul ul {
 top: auto;
 padding: 0;
 }
#menu ul li ul ul {
 width: 10em;
 left: 8em;
 top: auto;
 margin: 0 0 0 20px;
 }
#menu ul li:hover ul ul,
 #dropmenu li:hover ul ul ul,
 #dropmenu li:hover ul ul ul ul {
 display: none;
 border: none;
 }
#menu ul li:hover ul,
 #dropmenu li li:hover ul,
 #dropmenu li li li:hover ul,
 #dropmenu li li li li:hover ul {
 display: block;
 }
#menu ul li.current_page_item a { color: #FFFFFF; }
#menu ul li.current_page_item li a { color: #FFFFFF; }
#menu ul li li a { color: #FFFFFF; }
#menu ul li li a:hover { color: #B3A6BB; }
#menu ul li.current_page_item li a:hover { color: #FFFFFF; }
#menu ul li ul li.current_page_item a { background: none !important; }
With the new styling in place, your menu should now look like this (what you won’t see in this screenshot are the hover effects):

But what about the menu items? How would you change those?
Right now the theme is set up so that whatever Pages you create, they will show up in the menu. If you want to exclude any Pages from the menu, you can use one of the many plugins that are available which allows you to do exactly that, or you can follow the instructions in the WordPress Codex.
That being said, I decided to go with a more labor-intensive method which allows me complete control over what is in the menu. This method is especially useful for instances where you would prefer a top-level menu item for not be to be linked to a Page but only open up a sub-menu, as is the case for the “Links” menu item.
In order to do this, I opened up my header.php file again. All the way down below, you will see a div container called “menu”:
<div id="menu">
<?php if ( function_exists('wp_nav_menu') ) { wp_nav_menu( array( 'container_class' => 'menu-header', 'theme_location' => 'primary-menu', 'depth' => '4', 'show_home' => 'true' ) ); }
else {?>
<ul>
<li class="<?php if (is_home()) { ?>current_page_item<?php } else { ?>page_item<?php } ?>"><a href="<?php bloginfo('url'); ?>" title="Home">Home</a></li>
<?php wp_list_pages('title_li=&sort_column=menu_order&depth=4'); ?>
</ul>
<?php } ?>
</div>
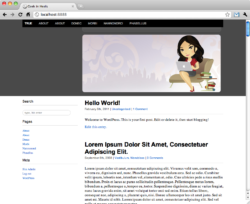
Since this code calls for all the Pages to be listed in the menu, you want to delete everything between <div id="menu"> and the very last </div> and replace it with an HTML list of your desired menu items. So in this case, the following is what I did:
<div id="menu">
<ul>
<li><a href="https://www.geekinheels.com/about">About</a></li>
<li><a href="https://www.geekinheels.com/archives">Archives</a></li>
<li><a style="cursor: pointer;">Links</a>
<ul>
<li><a href="https://www.geekinheels.com/friends">Friends</a></li>
<li><a href="https://www.geekinheels.com/bee-friends">Bee Friends</a></li>
<li><a href="https://www.geekinheels.com/favorite-sites">Favorite Sites</a></li>
</ul>
</li>
<li><a href="https://www.geekinheels.com/contact">Contact</a></li>
</ul>
</div>
Your menu should now look more like this (and when you hover over “Links” a sub-menu should slide out):

As always, if you have any questions, please don’t hesitate to let me know!
Up next: let’s finish the rest of the header section!

 I like books, gadgets, spicy food, and art. I dislike shopping, hot weather, and the laws of entropy. Although I am a self-proclaimed computer nerd, I still have a love for handbags and makeup... and I am always teetering on high heels. To learn more about me, visit the


Yeah!! I’ve been “patiently” waiting…each time my Reader shows a new post, I click over anxiously hoping and praying that it’s Installment #4…today my wish was granted! Thanks! I love these tutorials…
Thank you! It’s always nice to receive positive comments on these posts because they take forever to write! 🙂