
Prelude
Part 1: Setting Up
Part 2: Set the Bare Bones
Another great thing about the ET-Starter theme is that it allows you to easily set your header and background — whether it be an image, a color, or both. Just navigate to the “Appearance” menu on the left side of your WordPress admin page, and you can choose “Background” or “Header” and make the changes accordingly.

If you are happy with just uploading a header, you can stop right here.
If you want to know how I managed my header, read on…
My header is actually a combination of two images —
A background image that is 1px wide and 350px high, repeated horizontally:
![]()
And the actual header image that is 900px wide and 350px high, layered on top of the previous image:

Why the layering? It’s because I do not know the screen size, or the screen resolution that a visitor will be using. So if someone is looking at my blog from a 30″ screen set at the highest resolution possible, it is very likely that the header image will be cut off at the ends. By layering a repeated, 1px-wide image below it, the visitor will be under the impression that it is one, wide header image.
(You can also choose to make the header image 3,000px wide or another width that is similarly high. But generally, we try not to do this as it will create an image with a big file size.)
Now in order to do this we have to adjust the style.css file. Find the body element (line 16 in the original file), delete what’s already there and add this instead:
body {
 height: 100%;
 margin: 0 auto;
 padding: 0;
 background: #FFFFFF url('/images/header_bg.jpg') repeat-x;
 border: 0;
 }
And in the highlighted portion, insert the URL to your own 1px-wide background image.
Next, find the #container element (line 48 in the original file) and replace what’s there with the following:
#container {
 width: 870px;
 height: 100%;
 margin: 0 auto;
 padding: 0 50px;
 background: url('/images/header.jpg') no-repeat top center;
 }
Again, replace what’s in the highlighted portion with the URL to your own header image.
Note that what’s really important in these CSS snippets are the background attributes. You can substitute your own margin, padding, height, width, etc according to what your own theme calls for.
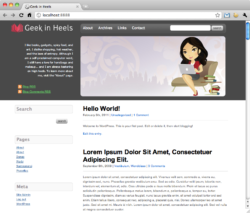
Now save your style.css file. Let’s see what your theme looks like now…

But wait — why is the old header image there?
You can see our intended header image peeking out from the bottom, so you’re on the right track. What we need to do is to remove the call to function in the header.php file that “calls” the ET-Starter theme’s header image.
Open the header.php file. If you are familiar with HTML, it shouldn’t be too difficult to figure out.
Take a look at the first few lines that come right after the <body> tag:
<div id="header">

<h1><a href="<?php echo get_option('home'); ?>/"><?php bloginfo('name'); ?></a></h1>

<h2><?php bloginfo('description'); ?></h2>

</div>
<div id="headerimage">

<img src="<?php header_image(); ?>" width="<?php echo HEADER_IMAGE_WIDTH; ?>" height="<?php echo HEADER_IMAGE_HEIGHT; ?>" alt="" />

</div>
The first section calls for your blog title (name) and tagline (description), while the second calls for the theme’s header image. Once again, if you know HTML, this shouldn’t be too difficult.
So in order to get rid of the theme’s call to header image, all we need to do is delete that second section. That’s it!
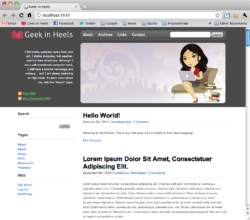
Save your header.php file, and your theme should now look like this:

While we’re at it, let’s get rid of the call to site title and tagline too, since I won’t need it for this theme. (But if you want to keep them for your theme, you can style it accordingly using CSS.) So delete the first part of the code snippet shown above from your header.php file.

Lastly, let’s move down the sidebar and blog content so that they’re not overlapping the header image. To do this, go back to your style.css file and edit your .content.content-two-columncontent-right and .primary-sidebar.content-two-columncontent-right elements (remember those from Part 2?). All you need to do is to add some margin to the top by adding the following line to each element:
margin-top: 300px;
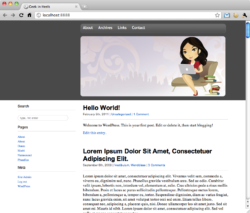
Save your style.css file, and your theme should now look like this:

As you can see, we’re really starting to get there!
Next up: styling the rest of the header elements. Please let me know if you have any questions along the way!

 I like books, gadgets, spicy food, and art. I dislike shopping, hot weather, and the laws of entropy. Although I am a self-proclaimed computer nerd, I still have a love for handbags and makeup... and I am always teetering on high heels. To learn more about me, visit the