
Prelude
Part 1: Setting Up
Part 2: Set the Bare Bones
Part 3: The Header
Part 4: The Main Menu
Part 5: The Rest of the Header
Because the ET-Starter theme is set so that the user can choose between one, two, or no sidebars (in whichever relative position to the main content), there exists various CSS classes for each type of sidebar and it location. For the purposes of this theme, the CSS classes we will be working with are .primary-sidebar and .primary-sidebar.content-two-columncontent-right.
WordPress sidebars are relatively simple to style provided that you do not make any crazy changes to the structure of the theme. Each sidebar heading is set to h2, and each item below that is usually listed via the use of HTML lists (ie, ul and li).
As such, this is how my sidebar is styled (please note that rounded corners do not show on Internet Explorer browsers older than IE9):
.primary-sidebar {
 margin: 270px 0 60px -12px;
 padding: 0;
 overflow: hidden;
 font-family: Verdana, sans-serif;
 font-size: 11px;
 line-height: 1.72em;
 }
.primary-sidebar.content-two-columncontent-right {
 float: left;
 width: 240px;
 }
.primary-sidebar h2 {
 margin: 30px 0 6px 0;
 padding: 0 0 0 6px;
 overflow: hidden;
 background: #F9F9F9;
 border: 1px solid #DDDDDD;
 font-family: 'Lucida Sans Unicode', 'Lucida Grande', Tahoma, sans-serif;
 font-size: 18px;
 font-weight: bold;
 line-height: 1.8em;
 color: #A09CA1;
 -moz-border-radius: 6px;
 -khtml-border-radius: 6px;
 -webkit-border-radius: 6px;
 border-radius: 6px;
 }
.primary-sidebar p,
 .primary-sidebar img,
 .primary-sidebar ul,
 .primary-sidebar ul ul ul {
 margin: 0;
 padding: 0;
 }
.primary-sidebar ul li {
 margin: 0;
 padding: 0;
 line-height: 20px;
 list-style-type: none;
 }
.primary-sidebar ul ul {
 margin: 6px 0 40px 0 !important;
 padding: 0 0 0 7px;
 }
.primary-sidebar ul ul li { list-style-type: none; }
.primary-sidebar ul ul ul li {
 padding: 0;
 margin: 0 0 0 14px !important;
 list-style-type: square;
 list-style-position: inside;
 color: #898989;
 }
.primary-sidebar ul ul a:link,
 .primary-sidebar ul ul a:visited,
 .primary-sidebar ul ul a:active {
 color: #336699;
 text-decoration: underline; }
.primary-sidebar ul ul a:hover { color: #6699CC; }
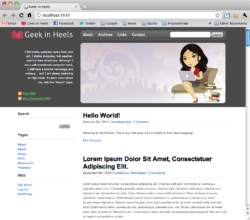
Replace the current sidebar and primary-sidebar CSS in your style.css file with the above, and you get this:

Now, let’s customize the sidebar so that it looks a bit more like my current blog.
Right now the “Search,” “Pages,” and “Meta” sections in the sidebar are the default sidebar content that comes with every WordPress installation. And if you add any widgets to the sidebar of your theme, these three sections will disappear.
Luckily, because the ET-Starter theme is widgets-ready, all you need to do to add or take away sections in your sidebar is to drag and drop the various widgets (to the Primary Sidebar, in this case).
Log into your WordPress admin, and navigate to the “Widgets” menu under the “Appearance” section.
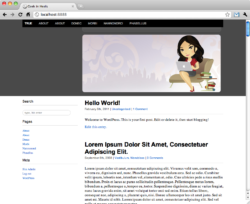
If you look at my sidebar right now, you will see that I have the following sections:
- Connect (list of links)
- Chirp, Chirp (my latest Twitter update)
- Explore (list of categories)
- Recent Posts
- Recent Comments
- Popular Content
And these are the widgets I used for each section:
| Connect | Text widget |
| Chirp, Chirp | Twitter Widget Pro widget |
| Explore | Categories widget |
| Recent Posts | Recent Posts widget |
| Recent Comments | Recent Comments with Avatars widget |
| Popular Content | Text widget |
(The last post in this series will list all my favorite plugins, so stay tuned if you’re curious as to which plugins in addition to the two listed above I use for this blog!)
And for each widget, if anything didn’t look the way I wanted or I wanted additional styling, I just turned to Chrome’s “Inspect Element” feature again to find the appropriate CSS class/ID to make the changes. For example, the pink dots at the left of each “Recent Posts” entry? After discovering that WordPress’ Recent Posts widget uses the CSS class .widget_recent_entries I just added the following to my style.css file:
.widget_recent_entries ul li {
 margin: 6px 0 6px -5px;
 padding-left: 15px;
 background: url('/images/pink_bullet.png') no-repeat 0 2px;
 }
Be warned though, that both the Twitter widget and the Recent Comments widget required extra CSS formatting in addition to my actually going into the plugin’s PHP file to re-organize the structure so that I could get them to look exactly the way I wanted. I will not get into them in this post, but if anyone’s really curious, please let me know and I’ll show you what I did.
Once again, I kept going back and forth and experimenting until I got my desired effect:

Next: styling the date of each entry!
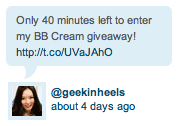

 I like books, gadgets, spicy food, and art. I dislike shopping, hot weather, and the laws of entropy. Although I am a self-proclaimed computer nerd, I still have a love for handbags and makeup... and I am always teetering on high heels. To learn more about me, visit the
