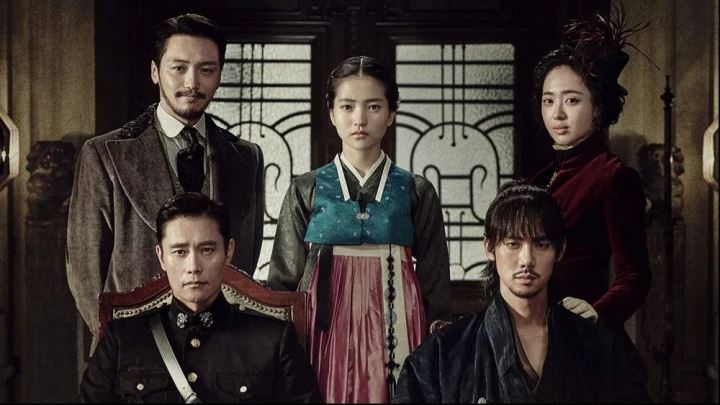
Feb
7
2012

Cool Tool Tuesdays: La Mer The Powder and The Powder Brush

Welcome to today’s installment of Cool Tool Tuesdays, where I feature a favorite item from my life and spotlight it so that others who are not familiar with the product may also benefit from it. A cool tool can be any book, gadget, software, hardware, material, or website that I have personally tried and love.

Do you have any questions about today’s cool tool? Would you like an item featured in the future? Please leave a comment to this post, or send me a message via my contact form. Enjoy!


As I looked around my room to find inspiration for today’s Cool Tool Tuesdays, my eyes rested on a pair of products I have never written about before — and I couldn’t believe I haven’t, because I have been using it diligently for the past five years!

This products are La Mer’s The Powder loose powder and The Powder Brush.

I think that the reason I had failed to mention them in the past is because I do not consider it an essential part of my beauty routine. In other words, I — like most women — can certainly live without loose powder.

However, I believe that they deserve a post because they are the only beauty products, aside from  my beloved MAC Liquidlast liner, that I truly consider HG (“Holy Grail” in makeup talk) because I honestly have never found any product that even comes close.

La Mer’s The Powder is one of the most finely-milled loose powders I have ever seen. It comes in four shades, including translucent (I use Crème), and it leaves a soft, luminous finish that is unparalleled: not too matte with just the teeniest amount of dewiness to make it look natural. In fact, many reviewers use the word “angelic” to describe the finish that The Powder gives you — and they’re right!

The Powder Brush is a retractable brush that is designed for both pressed and loose powder application, and just like The Powder, many users seem to become smitten with it after just one use.

Now I’m not sure if The Powder would work just as well with another brush (I’ve never tried it with other brushes because I got them together and I don’t own another powder brush), but I do know that The Powder Brush must at least play a small part in delivering the phenomenal result.

I like to use The Powder to set my makeup and add a finished look to my face. These days I’ll use it over BB Cream and that works just fine — while The Brush is still retracted, I’ll take the compacted, half-an-inch or so end of the brush that sticks out of the tube to dip into The Powder and pat under my eyes to ensure that my eye makeup stays in place. Then I will fully extend The Brush, apply more of The Powder and fluff it over my entire face.

The Powder is pretty expensive at $65 and The Powder Brush even more so at $75.  8-O  But you know what? I am still using the same powder and brush I bought over five years ago. The Powder seriously seems to last forever, because even if I only used it once a week (and I know I’ve used it much more often than that), that’s over 260 applications!

What’s more, I still have 1/3 of a bottle left! 

The only complaint I have about either of the products is that The Brush’s casing is not scratch resistant, and mine is covered in ugly scratches from the times I have traveled with it. But it still works fine, and that’s what’s important.

I highly recommend that everyone reading this go visit their closest La Mer counter and try these for themselves!

Feb
1
2012

Claire’s First Trip to the Liberty Science Center

First children are bound to feel neglected and resentful at times when a younger sibling comes along. So far, Claire has been doing splendidly with the addition of Aerin into our lives, but there are moments here and there where I can see the sadness in her eyes when we are preoccupied with Aerin. :-(

To help her know that we will never stop loving her, this past Sunday, we decided to give Claire some “alone” time with mommy and daddy by taking her to the Liberty Science Center. (J’s parents graciously agreed to watch Aerin while we were out.) We actually live just 15 minutes away from this wonderful, interactive science museum and I had been dying to take Claire for ages.


The Liberty Science Center is New Jersey’s largest and newest museum, and also houses
the nation’s largest IMAX Dome. 

The entrance to the Science Center is grand, with an expanding & collapsing sphere by Chuck Hoberman. We spent quite some time in the main lobby so that Claire could stare up at the sphere. I think she could have spent hours there if we hadn’t dragged her away.


(image source)

Claire is still too young to enjoy the majority of the museum. The very first exhibit we entered was called Energy Quest, which explores various types of energy, and our overly shy and cautious daughter seemed more scared than captivated by the loud and startling stations.

So we decided to move on to Our Hudson Home, which we knew housed some large fishtanks, and score! She LOVED it.

(Before I go on, I must apologize for the quality of the following pictures. Someone — ahem! — forgot to check the battery on our camera before we left the house, so all the photos from this outing were taken with a cell phone camera.)

She loved the fish so much that even when we had seen everything and tried to exit the exhibition, she repeatedly turned around to go back for more.

Other highlights of the day included a floating beach ball…

And an exhibition called Eat and Be Eaten which had more live animals.

As stated above, most of the exhibitions were much too advanced for our 16-month-old. However, whenever we saw a button we let her press it. She loves buttons (she even knows which buttons to press for our building’s elevator!) and pressing each one to see an interactive display unfold made her squeal and clap on more than one occasion.


It makes me sad to think that she might not know what these are when she grows up.

We would have loved to have visited the I Explore exhibition, which is specifically designed for kids aged 2-5, but there was a private party going on there at the time. :-(  There’s always next time, right?

J and I have agreed that we will almost definitely be purchasing a family membership to the Liberty Science Center when our kids get a bit older. We may even plan a birthday party there — I checked, and the prices aren’t as exorbitant as I had feared.

In the meantime, I plan to continue to visit with my eldest in tow whenever we need some “mommy & me” time…..and when Aerin gets old enough to appreciate the Science Center too, I am guessing that we will be making numerous family trips.

Jan
24
2012

Cool Tool Tuesdays: What I Use to Clean and Protect My MacBook Pro

Welcome to today’s installment of Cool Tool Tuesdays, where I feature a favorite item from my life and spotlight it so that others who are not familiar with the product may also benefit from it. A cool tool can be any book, gadget, software, hardware, material, or website that I have personally tried and love.

Do you have any questions about today’s cool tool? Would you like an item featured in the future? Please leave a comment to this post, or send me a message via my contact form. Enjoy!


Some people like to rough up their gadgets, add personalizations, and give it some character.

I am not one of those people. In fact, I am the complete opposite: I like to keep my gadgets looking as new as the first day I got them.

(This also helps tremendously with their resell values. I was able to sell my old 4-year-old PowerBook for $500!)

Loyal readers may remember that my beloved MacBook Pro died on me last fall. And when I finally got a replacement, I knew that I wanted to protect my investment. After all, it was THE biggest purchase I had made in years, in addition to being a fragile item I knew I would be using every day.

1. Protecting the Keyboard

One of the reasons I was so sad to have my old MBP die on me is because I vastly prefer the old body design of the MBP over the newer, unibody construction. (Anyone else with me?)

And the thing I hate the most about the unibody MBP? The black plastic keys.


A comparison between the unibody MBP (left) and the older model, which I had (right).
(image source

I loved the silver keys on the old MBP — a design which carried over from the PowerBook days, which was actually my first Apple computer back in 2001 — and believe that the black keys have a cheap feel to them compared to the silver ones. (Although to be fair, the silver keys were made of plastic too. However, they were sprayed with a matte silver finish that made them look metallic.)

And wouldn’t you know it — my fears were confirmed when, just TWO WEEKS into using my new MBP, shiny spots began to appear on the space bar and a couple of other most-used keys.

These shiny spots were not oil spots. Instead, they were “wear and tear” spots, from the matte finish on the keys wearing away.

A brief perusal of the web told me that indeed, this is a common problem among unibody MBP users and that the best course of action is to purchase a keyboard protector.

NOW YOU TELL ME!

I quickly discovered that best keyboard protector for the MBP is the Moshi ClearGuard, which is advertised as the thinnest keyboard cover/protector on the market at 0.1mm thin, or one-fifth the thickness of silicone protectors.

You might think that the $25 price tag is pretty steep for a piece of plastic. But I freakin LOVE this thing. It creates a bit more traction for typing, it allows for the keyboard lights to shine through, and I no longer need to worry about small spills, tiny particles entering the inside of my MBP through the keyboard cracks, or the dreaded shiny wear-and-tear spots on my keyboard.

The best part? It is washable and reusable!

As for the existing shiny spots on my keyboard? They were bothering me so much (yeah, I’m OCD with my gadgets) that I tried a potentially dangerous remedy: the Mr. Clean Magic Eraser. Because the Magic Eraser is a very fine abrasive, and because I would be wetting it before use, there was some potential for disaster.

However, I squeezed out all but the teeniest amount of water from the Magic Eraser before use, and very gently rubbed the offending spots. It took about 5 minutes of rubbing per key, but it worked. My keys looked brand new again. Problem fixed. :-D

3. Protecting the Body

What about the rest of the MBP? I certainly wanted to protect it from scratches as well as dinges and dents, which are all very likely with a very clumsy owner and two young children at home.

I decided that a hard case — despite the extra girth it would add, in addition to covering the beautiful design of the MBP — would be best suited for my needs and decided on Speck Products’ SeeThru Satin Case.

Installation was a snap — literally — and I love that the material is a smooth, rubbery texture. It has already protected my MBP from a number of incidents which would have surely left ugly scratches on the beautiful aluminum finish, and the case doubles as a sleeve for travel purposes.

It is also transparent enough to let the lighted Apple logo softly shine through:

3. Cleaning the MacBook Pro

When I replaced my PowerBook with a MacBook Pro in 2008, I purchased an iKlear Cleaning Kit along with it.

And if you too, own an Apple product, you should get one too.

iKlear is the only brand that is used by Apple in its stores to get its products clean. It is both ammonia and alcohol free — both of which are chemicals that can damage your screen. (This isn’t false information to boost the sales of iKlear and other products like it. I have a friend who used an alcohol-based wipe on his MacBook Pro and it left a permanent streak.)

There are various iKlear kits available for sale, but all you really need are the basic three items: the spray, the antimicrobial microfiber cloth, and the chamois cloth. (The microfiber cloth is to clean the entire product in conjunction with the spray, while the chamois cloth is used dry, to buff the screen.)

If that isn’t incentive enough for you, I am still using the same exact kit I purchased in 2008. This stuff lasts a loooong time, and is completely worth every penny.


Which products, if any, do you use to keep your laptop — as well as other gadgets — clean and protected? Can you recommend any alternatives to the three I’ve listed above?

Jan
17
2012

Cool Tool Tuesdays: Panasonic Electric Thermo Pot

I have decided to implement some regularity to this blog. I believe that not only will it give readers something to look forward to on a weekly basis, it will also force me to be more creative as well as provide a focus when I am struggling with writer’s block.

The new schedule will not be too rigid, because anyone with kids — heck, without kids too — knows that life is anything but predictable. So for now, I plan on doing the following:

  • Cool Tool Tuesdays, where I feature a favorite item from my life and spotlight it so that others who are not familiar with the product may also benefit from it. A cool tool can be any book, gadget, software, hardware, material, or website that I have personally tried and love.
  • Bloggy Thursdays, where I share with my fellow bloggers tips and tutorials to maximize your own blog. While I do not consider myself an expert, I do like to think that after 10+ years of blogging — in addition to my technical knowledge — I know more than the average blogger when it comes to making your blog better and more attractive to readers. (Except for content. I have no real tips on content. ;-) ). Since I currently use WordPress and it happens to be the most popular blogging platform in the world, these tips will mostly cater to the WordPress crowd.
  • Reverent Sundays, where I write about an aspect of my faith. This can deal with recent books I have read on Christianity, my thoughts on religion and current issues, as well as particular messages I find touching and/or powerful. I am aware that most of my readers are not religious, and that is fine — you are more than welcome to not read these posts if they make you uncomfortable, enrage you, or bore you to tears. I am open to debates and discussions in the comments section as long as everyone remains respectful.

Now, on to my first installment of Cool Tool Tuesdays

The two most-used appliances in my kitchen are our rice cooker and the Panasonic NC-EH30PC 3-Quart Electric Thermo Pot.

The rice cooker is a no-brainer for an Asian household that eats rice practically every day. But the electric water boiler and dispenser? I personally had no idea such things even existed before I got married. :oops:  However, a water boiler/dispenser was the first appliance that my MIL bought for us and it quickly became one of my favorite items in the kitchen.

We use the Panasonic Electric Thermo Pot to easily prepare tea and other hot drinks, as well as instant dishes that require boiling-hot water. It became indispensable when we had babies — instead of purchasing a bottle warmer or running the bottle under hot water from the sink, we just fill a mug with hot water from the Thermo Pot and let the frozen/refrigerated bottle sit in there for a couple of minutes.

As you can see in the picture above, there are 4 temperatures to choose from (we usually keep it at 190°), and the built-in sensor ensures that your water will stay at that temperature unless specified. The “Lock/Unlock” button guards against unintended dispensing (it automatically locks after just a few seconds after dispensing), and the power cord is the magnetic kind that breaks away easily under pressure. Additionally, the Thermo Pot automatically shuts off if the water level gets too low.

J can’t believe that I never heard of these types of electric water boiler/dispenser units until I got married. He says that they are a staple in all Chinese households — mostly for the tea — and wonders why not all western households have them.

My MIL had actually purchased for us a Tiger brand when we first got married, but it broke after about three years of continued use. :-( The specific model we had has since been discontinued, so we got a Zojirushi brand to replace it. However, Zojirushi had one major flaw: there is a big hole at the bottom of the boiler where particulates get caught, so it constantly needed to get cleaned.

My MIL ended up comparing various brands in person before choosing this Panasonic version. We still like the discontinued Tiger one the best, but this is a close second. (It also doesn’t hurt that the Panasonic is the cheapest of the three brands! :-D )

I love my Panasonic Electric Thermo Pot so much that I gifted it to my parents for Christmas two years ago, and they in turn liked it so much that they purchased an extra one so that they could keep one at home and another at the store.

The Panasonic Electric Thermo Pot comes in three sizes: 2.3 quart, 3 quart, and 4.1 quart.

Disclaimer: the links in this post are Amazon Associates links, where I will get a small percentage of the purchase price if anyone orders through these links.

Jan
8
2012

Site Downtime, and a New Host

If you tried to visit this site yesterday or earlier today, you were probably met with a big fat error message. :-(  

I thought that the problem had resolved itself by Saturday evening, when the site briefly came back online after my web host reset the server, but the reprieve only lasted a couple of hours.

This was the second time in less than a month that this had happened. (Third, if you count the reset on Saturday.) Add this to the consistently sloooow loading time I had been experiencing in the past half year, and we had a problem on our hands.

It wouldn’t have been half as bad if my host’s customer support:

  1. Hadn’t taken seven hours to respond to my first email, then another four to my response;
  2. Had a method aside from just email for me to contact them;
  3. Had not only given me possibilities of the cause of the downtime and flat-out refused to answer some of my questions (“Sorry, we cannot release that information.”)

The only straight suggestion they could offer was for me to upgrade to a VPS (virtual private server) hosting plan, since it seemed that my traffic had outgrown the shared hosting I currently use.


I wish there was a cool reasons for this site being down — like TumblBeasts — but alas,
it was just my overworked shared host.

After doing some research to confirm that it was, in fact, time for me to upgrade to a VPS, I decided to switch hosts as well.

And the result, after browsing through various reviews, forums, and charts online, was the decision to go with InMotion as my new host.

Last night and this morning saw me transferring files and setting things up on my new host. I predictably had some questions and ran into some snafus, but was extremely impressed with InMotion’s support — which is available 24/7 via email, phone, or live chat(!).

They even provided me with a temporary URL and cPanel so that I could get my site up and running before I start pointing my domain to the new host.

Already, I could see a huge improvement in speed. For example, it took more than twice as long for me to download a large file from Dreamhost than to upload that same file to InMotion. And my site on their temporary URL? Snappy as can be!

Now, I am just waiting for the domain to transfer over. Which I am — once again! — waiting for my old host (which also hosted my domain) to respond.

I can’t wait until the transfer is complete! Seriously — you guys have no idea how much the slow loading time was bugging me!

(InMotion has not compensated me to write this post, nor am I an affiliate looking for referral credit. I genuinely believe that they are awesome and am really looking forward to hosting my site with them.)

  • Sponsors

  • Chirp, Chirp

  • Become a Fan!